Git 学习笔记
XiaO / 2020-05-13
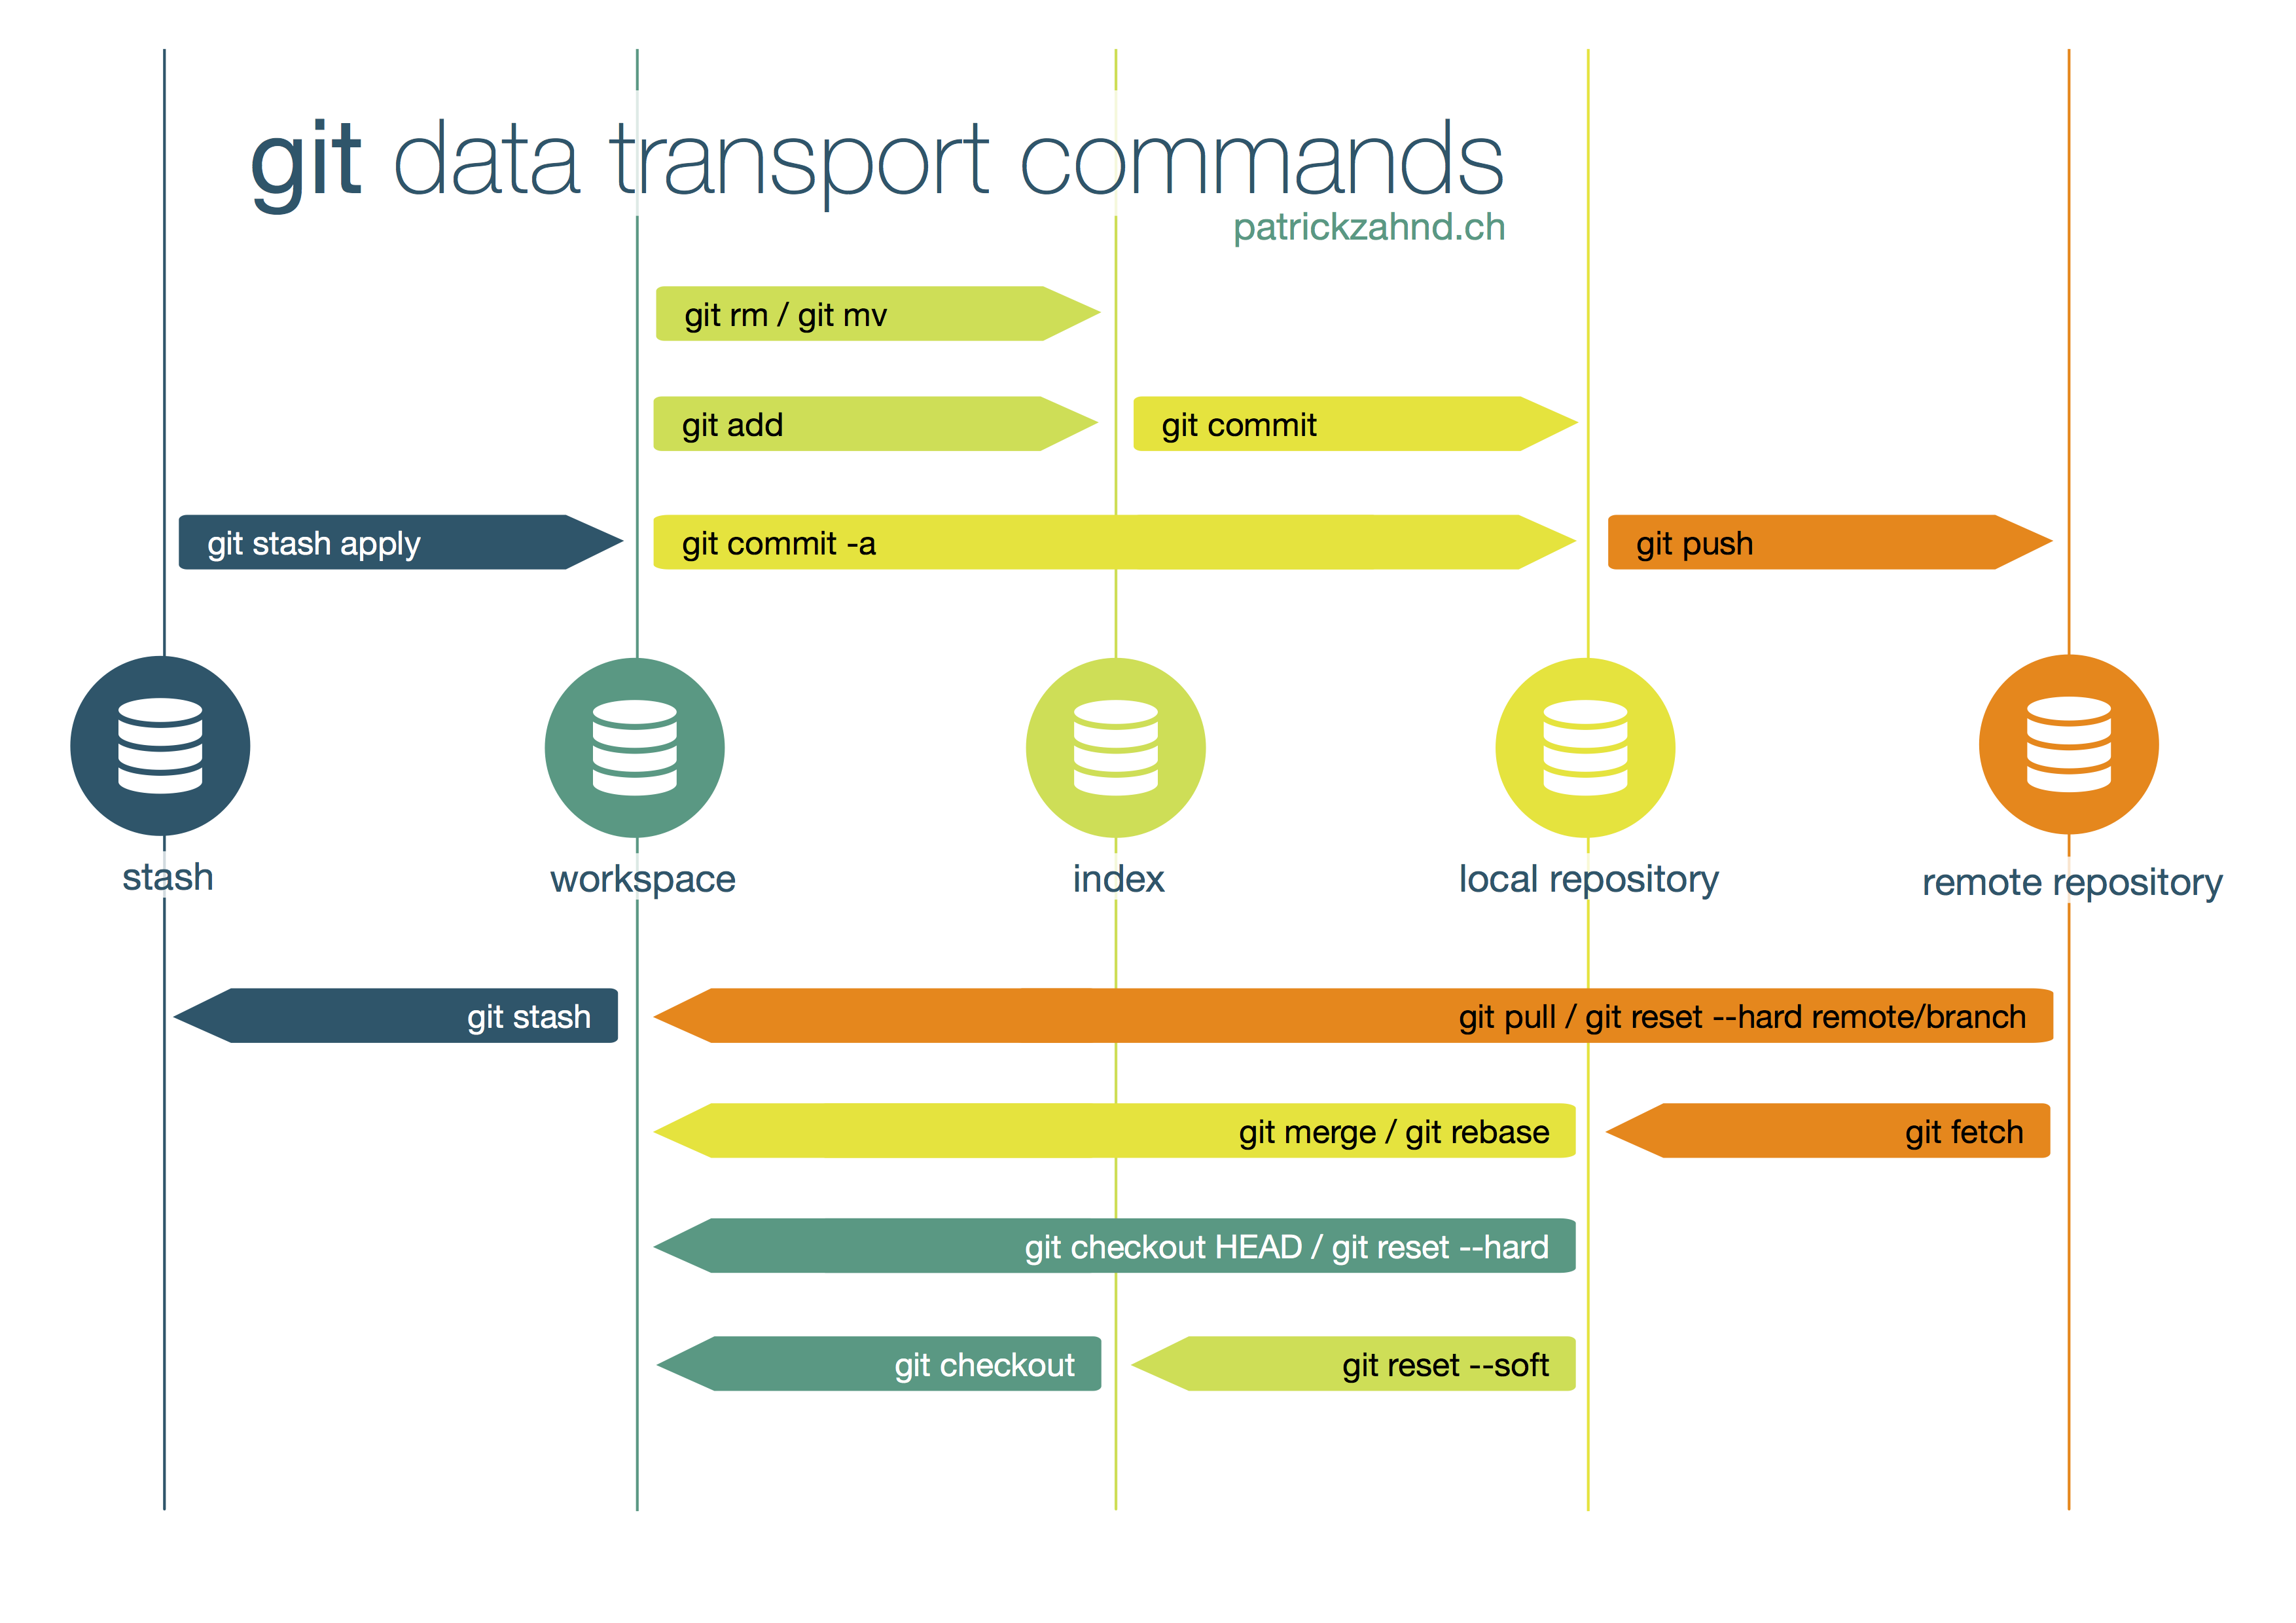
Git 从概念上分为 3 个区域,分别是工作空间、本地仓库和远程仓库。另外还有一个暂存区域,也称为索引区。Git 是分布式版本控制的关键点是它具备一个本地仓库,其实平时的版本控制工作都是在本地库操作,如果不涉及团队协作或者备份,甚至可以只使用本地库即可。
- 工作空间:其实就是我们在操作系统上的工作目录。我们能够通过操作系统的文件管理命令进行查看(例如在 Linux 上通过
ls命令); - 本地仓库:工作空间有一个隐藏目录
.git,这个目录及其内容并隶属工作空间,而是 Git 的本地仓库。它是用来实现版本控制的; - 远程仓库:远程仓库是存储在远程服务器上的仓库,主要实现多用户的协同;
- 暂存区: 暂存区一般存放在
.git目录下的index文件(.git/index)中,所以我们把暂存区有时也叫作索引(index)。

创建工作空间
创建工作空间其实就是创建一个本地目录,在 Mac 平台执行如下命令:
mkdir gittest
然后切换到该目录,并在里面随便创建一个文件:
cd gittest
echo "Hello, Git." > test.md
创建本地仓库(git init)
保持在刚才创建的文件夹内部(工作空间),通过执行 git init 命令就可以初始化一个本地仓库:
git init
完成本地仓库的创建后,可以在当前目录下看到一个新增的隐藏目录.git,Git 就是通过这个目录里面的内容实现版本控制的。
查看状态(git status)
创建完成本地仓库之后就可以查看工作区的状态了。通过git status命令可以查看工作空间的状态(也就是文件的被管理情况)
git status
执行该命令后,结果如下,可以看到在该工作区有一个文件,且处于未管理状态。
%  git status
On branch master

No commits yet

Untracked files:
  (use "git add <file>..." to include in what will be committed)
	test.md

nothing added to commit but untracked files present (use "git add" to track)
添加文件(git add)
通过上面的操作,我们已经有了一个本地仓库了,但是本地仓库内部并没有管理任何内容。我们这一步做的就是让它管理一个文件。我们在前面工作空间中已经创建了一个名为 ’test.md’ 的文件,这是个普通的文本文件,内容是 “Hello, Git."。我们这步先把它管理起来,具体执行如下命令:
git add test.md
此时已经将该文件添加到了暂存区。然后我们在执行以下 git status 命令,可以看到如下结果。该文件已经被管理起来了,从提示我们可以看到这个文件还没有提交,意思是文件还没有真正在本地仓库里面,只是在暂存区而已。
%  git status
On branch master

No commits yet

Changes to be committed:
  (use "git rm --cached <file>..." to unstage)
	new file:   test.md
提交文件(git commit)
提交文件其实就是将文件提交到本地库,也就是开始进行真正的版本管理了。具体可以通过执行如下命令,其后面的 -m 选项表示该次提交的注释内容。
git commit -m "add new file"
完成提交后会有相应的返回,提示提交的结果:
% git commit -m "add new file"
[master (root-commit) abf0460] add new file
 1 file changed, 1 insertion(+)
 create mode 100644 test.md
完成提交后,我们可以在看一下这个工作空间的状态git status。可以看到此时本地仓库中的内容与工作空间已经完全一致。
%  git status
On branch master
nothing to commit, working tree clean
查看提交日志(git log)
完成提交之后,在本地仓库已经有了我们刚才提交的内容。也就是说现在本地仓库已经对我们的内容进行版本控制了。那么,我们怎么知道已经做了哪些提交呢?这个时候 git log 命令就派上用场了。从字面上我们也能猜出大概用途来,这个命令是用来查看提交日志的。
git log
从下图可以看到提交的基本信息,包括提交的 UUID、作者、日志和描述信息等内容。
% git log
commit abf04605816e9da36b4f3219c4e562a19823015e (HEAD -> master)
Author: xiao <[email protected]>
Date:   Wed May 13 15:32:27 2020 +0200

    add new file
查看提交详情(git show)
如果我们想看一下提交的详细内容又该怎么办呢?通过 git show 命令可以查看某一次提交的详细内容。以上次提交为例:
git show abf04605816e9da36b4f3219c4e562a19823015e
由下图可以看到提交的详细内容,除了上一个命令所涉及的简要信息外,还包括具体修改的那个文件,哪一行,以及具体修改的内容等等。
% git show abf04605816e9da36b4f3219c4e562a19823015e
commit abf04605816e9da36b4f3219c4e562a19823015e (HEAD -> master)
Author: xiao <[email protected]>
Date:   Wed May 13 15:32:27 2020 +0200

    add new file

diff --git a/test.md b/test.md
new file mode 100644
index 0000000..296c546
--- /dev/null
+++ b/test.md
@@ -0,0 +1 @@
+Hello, Git.
查看工作空间修改情况(git diff)
我们在本地进行修改后,有的时候想了解当前工作区的内容作了哪些修改,这个时候可以使用 git diff 命令进行查看。
git diff
执行该命令是查看工作空间与暂存区的差异情况。比如我们在 test.md 文件中增加一行写上你好啊,此时执行git diff 命令,就能看到新加的内容:
% git diff
diff --git a/test.md b/test.md
index 296c546..b931d68 100644
--- a/test.md
+++ b/test.md
@@ -1 +1,3 @@
Hello, Git.
+你好啊
如果我们把这个文件加入暂存区,然后在执行相同的命令,这时我们将看不到任何差异提示。
恢复到某个点(git reset)
Git 提供了 git reset 命令来解决代码回退的问题。比如我们对刚才添加的代码不满意,想通过 Git 命令回退到之前的版本。这是需要找到期望回退版本的 commit id(可通过 git log 中相应的备注查看),然后执行如下命令。
% git reset --hard abf04605816e9da36b4f3219c4e562a19823015e
HEAD is now at abf0460 add new file
创建分支(git branch)
分支 (branches) 是指在开发主线中分离出来,做进一步开发(比如新特性)而不影响到原来主线。实际上在我们创建完本地仓库时,就已经有一个分支了,只不过这个分支是主分支,也叫主线(master)。如图所示,在实际应用中除了主分支外还会有其它分支用于开发新特性。当完成新特性开发后,将代码统一合并到主分支中。

通过命令 git branch -l 可以看到本地库已有的分支:
git branch -l
可见,目前只有一个主分支:
% git branch -l
* master
上述所有控制都是在 master 分支上进行的,现在执行 git branch 命令创建一个新的分支
git branch dev
创建完成后,我们通过 git branch -l 可以看到已经有一个新的分支,名称为 dev。其中 * 标记的是当前工作空间所在的分支。
% git branch dev
% git branch -l
  dev
* master
%
切换分支(git checkout)
通过 git checkout 命令可以将工作空间切换到新创建的 dev 分支。
git checkout dev
% git checkout dev

Switched to branch 'dev'
然后通过 git branch -l 可以看到发生的变化,此时 dev 分支被 * 号标记。
% git branch -l
* dev
  master
切换分支以后,再提交的代码就位于新的分支。
此时我们对文档进行修改,添加一行文字 “new feature from dev”,然后保存。我们用 git diff 比较一下当前工作空间与暂存区的差异,可见结果显示,新增了一行。
% git diff
diff --git a/test.md b/test.md
index 296c546..1ae6afd 100644
--- a/test.md
+++ b/test.md
@@ -1 +1,2 @@
Hello, Git.
+new feature from dev
然后我们再次检查一下当前工作空间的状态git status,这里显示我们的修改还未加入暂存区:
%  git status
On branch dev
Changes not staged for commit:
  (use "git add <file>..." to update what will be committed)
  (use "git restore <file>..." to discard changes in working directory)
	modified:   test.md

no changes added to commit (use "git add" and/or "git commit -a")
我们加入暂存区后,再次查看状态:
% git add test.md
%  git status
On branch dev
Changes to be committed:
  (use "git restore --staged <file>..." to unstage)
	modified:   test.md
而后我们提交:
% git commit -m "new feature from dev"
[dev 5d41a16] New feature from dev
 1 file changed, 1 insertion(+)
%  git status
On branch dev
nothing to commit, working tree clean
需要注意的是,如果在分支做了一些修改,但还没有提交,这时切换分支会丢失已经做得的修改,因此切换之前需要提交代码。
合并分支(git merge)
假设我们在 dev 分支已经添加了一些内容,并进行了提交。此时我们想将这些内容合并到主分支中。合并的方法就是先切换到主分支,然后执行 git merge 命令。
git merge dev
切换到主分支:
%  git checkout master
Switched to branch 'master'
合并分支前,master 分支上,文本的内容:
% cat test.md
Hello, Git.
合并分支:
% git merge dev
Updating abf0460..5d41a16
Fast-forward
 test.md | 1 +
 1 file changed, 1 insertion(+)
%
合并分支前,master 分支上,文本的内容以及和 dev 分支上一样了,我们从 dev 分支所做的修改就同步到 master 分支了。
% cat test.md
Hello, Git.
new feature from dev
添加远程库(git remote add)
假设我们在 github 上已经有了一个空的远程库(远程库路径为 https://github.com/xxx/test.git),此时远程库没有任何内容。我们可以通过 git remote add 命令建立本地仓库与远程仓库的关联关系:
git remote add origin https://github.com/xxx/test.git
建立联系后,此时远程库依旧是空的。这里的 origin 只是我们给远程仓库的一个代名词,可以使用其它任何名称。
本地推送到远程(git push)
我们将本地的 master 分支推送到 github 上,执行如下命令,过程中需要我们输入 github 上注册的用户名及对应的密码:
git push origin master
默认情况下,git 会将代码推送到与本地分支同名的远程分支上。
Git 的一般流程是:添加到暂存区(git add),提交到本地仓库(git commit),最后推送到远程仓库(git push)。
克隆远程仓库(git clone)
克隆命令可以将远程仓库的内容克隆一份,生成一个一模一样的本地仓库,同时会生成工作空间的内容。
默认情况下工作空间的内容是 master 分支的内容,如果需要其他分支,则需要创建本地分支,并且进行切换。
git clone https://github.com/xxx/test.git
下载远程仓库的更新(git fetch/pull)
git 有两个命令可以将远程仓库的内容拉到本地:
git pull,可以将远程仓库拉到本地仓库,同时合并到本地工作空间;git fetch,可以将远程仓库的内容拉取到本地仓库,但并不会更新本地工作空间,需执行git merge命令将本地仓库相同分支的内容更新到工作空间。
查看代码的作者(git blame)
git blame 可以查看提交的 ID、作者和时间等信息。
% git blame test.md
^abf0460 (xiao 2020-05-13 15:32:27 +0200 1)Hello, Git.
5d41a16d (xiao 2020-05-13 17:33:23 +0200 2) New feature from dev
Mac 下设置 Git 的编辑器
设置 Sublime Text 作为默认编辑器:
git config --global core.editor "/Applications/Sublime\ Text.app/Contents/MacOS/Sublime\ Text"
检查是否成功设置:
Check : git config --global -e
知识点理解
查看和比较
git status查看当前工作区文件所处的状态;git diff比较当前工作区文件状态与暂存区的状态的差别;git diff --staged比较暂存区的文件状态与上一次提交后的差别;
比如一个自上一次提交后没有再做任何改动的 test.md 文件,查看一下状态:
% git status
On branch master
nothing to commit, working tree clean
我们在 test.md 文件中添加一行 Add the 3rd line后,用 git add 命令将文件加入暂存区,而后又在 test.md 文件中添加一行 Add the 4th line,然后我们查看状态:
% git status
On branch master
Changes to be committed:
  (use "git restore --staged <file>..." to unstage)
	modified:   test.md

Changes not staged for commit:
  (use "git add <file>..." to update what will be committed)
  (use "git restore <file>..." to discard changes in working directory)
	modified:   test.md
此时可见 test.md 文件有两个版本,一个是前一次加入暂存区的状态;另一个是我们做最后一次修改后的状态。我们用 git diff 来比较一下:
% git diff
diff --git a/test.md b/test.md
index 98c61a5..6b6c640 100644
--- a/test.md
+++ b/test.md
@@ -1,3 +1,4 @@
Hello, Git.
 New feature from dev
 Add the 3rd line
+Add 4th line
git diff 默认比较的是当前工作区文件状态与暂存区中的差别。如上已经列出,与暂存区相比新增了第四行。
如果我们需要比较暂存区与上一次提交的差别,用 git diff --staged 即可:
% git diff --staged
diff --git a/test.md b/test.md
index 1ae6afd..98c61a5 100644
--- a/test.md
+++ b/test.md
@@ -1,2 +1,3 @@
Hello, Git.
 New feature from dev
+Add the 3rd line
取消跟踪 (git restore)
将文件从 Git 跟踪清单中移除(文件依旧保留在磁盘上,只是 Git 将不再跟踪该文件),可用 git restore --staged 移除。
我们在目录下新增 test2.md 文件,并用 git add 将其加入到暂存区以跟踪该文件,我们看一下文件状态:
% git status
On branch master
Changes to be committed:
  (use "git restore --staged <file>..." to unstage)
	modified:   test.md
	new file:   test2.md

Changes not staged for commit:
  (use "git add <file>..." to update what will be committed)
  (use "git restore <file>..." to discard changes in working directory)
	modified:   test.md
我们突然又不想跟踪 test2.md 文件了,仍然想保留该文件在磁盘上,于是用 git restore --staged 命令移除对其的跟踪,再看一下状态:
% git status
On branch master
Changes to be committed:
  (use "git restore --staged <file>..." to unstage)
	modified:   test.md

Changes not staged for commit:
  (use "git add <file>..." to update what will be committed)
  (use "git restore <file>..." to discard changes in working directory)
	modified:   test.md

Untracked files:
  (use "git add <file>..." to include in what will be committed)
	test2.md
可见 test2.md 又重新回到未被跟踪的状态了。
删除文件 (git rm)
重置文件(git reset)

上诉图片标注了不同的重置方式作用的范围,更详细的图片解释可见官方文档
--hard
The Commit History ref pointers are updated to the specified commit. Then, the Staging Index and Working Directory are reset to match that of the specified commit.
该指令使得 HEAD 回退到某个提交点处,并将重置暂存区和工作区到那个提交点所处状态;
--mixed
The ref pointers are updated. The Staging Index is reset to the state of the specified commit. Any changes that have been undone from the Staging Index are moved to the Working Directory. Let us continue.
该指令使得 HEAD 回退到某个提交点处,并将暂存区的状态回退到工作区,也是 git reset 默认的方式。
--soft
The ref pointers are updated and the reset stops there. The Staging Index and the Working Directory are left untouched. A soft reset will only reset the Commit History.
该指令使得 HEAD 回退到某个提交点处,但是暂存区和工作区保持不变。
Git 保存数据的原理
Git 保存的是一系列不同时刻的快照。
进行提交操作时,Git 会保存一个提交对象(commit object),该提交对象会包含一个指向暂存内容快照的指针、作者的姓名和邮箱、提交时输入的信息以及指向它的父对象的指针。
首次提交产生的提交对象没有父对象,一个提交对象,包含了:
- 若干
blob对象(保存着文件快照); - 一个
树对象 (记录着目录结构和blob对象索引); - 一个 提交对象(包含一个指向上述树对象的指针和所有提交信息)

普通提交操作时,所提交的对象包含了在前述内容,并新增一个父对象:

git checkout 的用法
git checkout 命令的关联目标是 .git 文件夹下的 HEAD 文件。 在 Git 中,HEAD 是一个特殊指针,指向当前所在分支。

切换到 branchName 分支
git checkout branchName
新建 branchName 分支并切换到该分支
git checkout -b newBranch
git checkout <commit> 命令切换到 commit 参数指定的版本,该参数值可以是具体的 commit hash 值,可是是某个 Tag,也可以通过 HEAD index 来指定。例如,HEAD^ 对应当前版本的上一个版本,那么 git checkout HEAD^ 命令则讲文件切换到上一个版本,同时从当前分支脱离,处在一个未命名分支上。由于脱离了原先的分支,修改本地文件,并执行 git commit 进行提交,不会影响原来分支。
git checkout Commit or Tag
例如,我们切换到 Tag 为 v3.14 的版本后, Git 提示如下:
% git checkout v3.14
Note: switching to 'v3.14'.

You are in 'detached HEAD' state. You can look around, make experimental
changes and commit them, and you can discard any commits you make in this
state without impacting any branches by switching back to a branch.

If you want to create a new branch to retain commits you create, you may
do so (now or later) by using -c with the switch command. Example:

  git switch -c <new-branch-name>

Or undo this operation with:

  git switch -

Turn off this advice by setting config variable advice.detachedHead to false

HEAD is now at 9105949
git checkout 与 git reset 的区别 Stack 或官方文档

Here’s a cheat-sheet for which commands affect which trees. The “HEAD” column reads “REF” if that command moves the reference (branch) that HEAD points to, and “HEAD” if it moves HEAD itself.
| HEAD | 暂存区 (Index) | 工作区 (Workdir) | 是否安全 | |
|---|---|---|---|---|
git reset --soft [commit] |
REF | 否 | 否 | 是 |
git reset --mixed [commit] |
REF | 是 | 否 | 是 |
git reset --hard [commit] |
REF | 是 | 是 | 否 |
git checkour |
HEAD | 是 | 是 | 是 |
上面表格注明了不同命令的作用范围,如果命令移动了 HEAD 所指向的分支,则 HEAD 栏显示为 REF,如果命令仅仅移动了 HEAD 本身,则 HEAD 栏显示为 HEAD,以及相应的操作是否相对安全。标注否的需要谨慎操作。